Hi. I’m Scott Zhu

iOS & Android Developer. Geek. Dreamer.

Layout margin comes with iOS8

Setting your constraints relative to margin in a xib file or storyboard DOES NOT make your app crash on iOS7, and it DOES NOT make a UI difference on your iOS7 device neither, as long as you don’t touch the UIView.layoutMargins and UIView.preservesSuperviewLayoutMargins properties in your code.

What is Margins in iOS8

Layout margins represent padding around the interior of a UIView that the layout system can use when laying out subviews – to ensure that a gap is left between the edge of a view and a subview. In this respect it is very much like the padding property associated with blocks in CSS.

enter image description here

By default, a UIView has layout margins of 8 points on each side, and this can not be changed in Interface Builder, but by setting the UIView.layoutMargins property in the code which is only available on iOS8. I think iOS7 has its way to detect if you’ve set your constraints relative to margins or not, and it simply gives the constraints that related to margins extra 8 points space. However you can not change it because there’s no such property in iOS7.

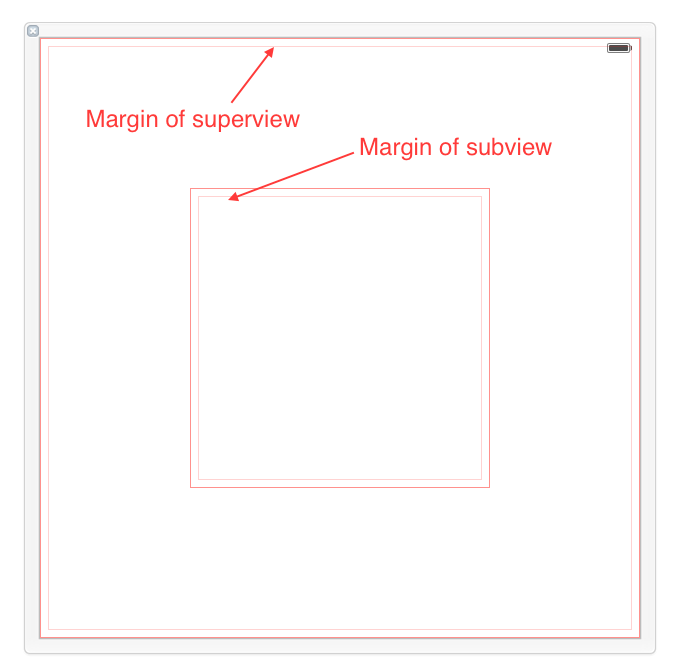
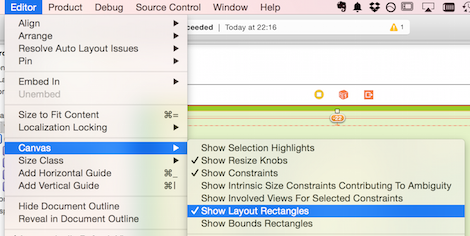
You can get IB to display the margins with Editor > Canvas > Show Layout Rectangles: enter image description here

Margins itself doesn’t affect the contents of your view at all. Every UIView come with its margins by default, it’s still there even if you don’t use it, not affecting anything. It only comes into use when you’re setting up a constraint that is related to margins. It’s only used to help you layout your view and subview.

How to use Margins

The only way to get margins involved in IB is to check the Relative to margin item while setting up your constraints. This is another way of declaring Use my margins instead of my edges while laying out me.

enter image description here

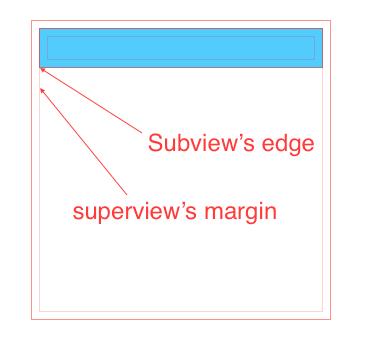
Let’s take a look at four different ways of setting up a leading constraint between a view and its subview. In this case of the constraint, the first item is subview’s leading and the second item is superview’s leading. While the leading is just a concept here, but mark and unmark the Relative to margin of each item, you can actually select the left edge or left margin as your leading here to use as your leading to layout your views.

  1. First item(uncheck), second item(check). In this case, we’re declaring that subview’s left edge should align to superview’s left margin(as what is shown in the image).enter image description here
  2. First item(uncheck), second item(uncheck), both using edge not margin. In this case, we’re declaring that subview’s left edge should align to superview’s left edge. enter image description here
  3. First item(check), second item(uncheck). In this case, we’re declaring that subview’s left margin should align to superview’s left edge. This kind of layout actually has made the subview overlap the superview.enter image description here
  4. First item(check), second item(check). This actually has a same effect as case 2, since both subview and superview has a same default margin. We’re declaring that subview’s left margin should align to superview’s left margin. enter image description here

What is good with Margins

This new feature comes with iOS8 doesn’t have a big impact on our way of developing UI if we’re not using the margins. But using it correctly can facilitates out development a bit in the case if we have many subviews displayed in a superview, and all the subviews share a same leading, top,… space to the superview. Because in this case, if we set all constraints with a fixed spacing, once there comes a change on the spacing we have to update the constraints one by one. However if margins were used, we can just reset the margin of the superview by just single line of code like,

1
self.rootView.layoutMargins = UIEdgeInsetsMake(0, 50, 0, 0);

However, this is only available on iOS8.

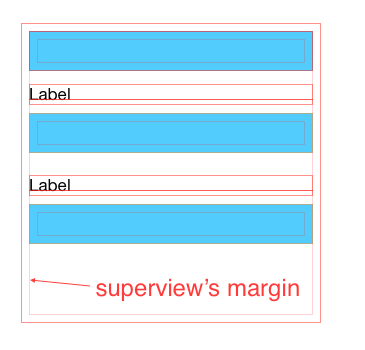
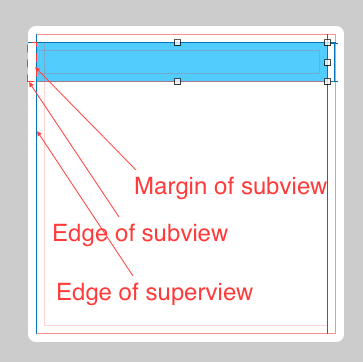
In the following case, all subviews’ left edges are aligned to superview’s left margin. Thus, changing superview’s left margin can affect all subviews at the same time.

enter image description here


Attach Stars to The End of a UILabel

In the past few days, I came across with a problem that when dealing with UILabel, which it’s content itself is a NSString. I need to

  • Attach some images (In my case, some stars) right by the end of the text in the UILabel
  • When there isn’t enough space in the end of the text for displaying the images, it auto wraps to the next line. Just like how UILabel deals with words wapping.
  • Attach it at whichever place in the text as I want

Here is how the effect looks like when it’s done.

  • When there is enough space in the end, enter image description here
  • When there is no enough space in the end, enter image description here

So my way here to tackle this issue, is to use NSTextAttachment. NSTextAttachment takes a UIImage as argument , the NSTextAttachment itself then can be attached to an empty NSAttributedString by calling:

1
[NSAttributedString attributedStringWithAttachment:starViewAsAttachment];

Now you got a NSAttributedString with the image you want just like a normal word in it. To insert it anywhere in a text, you just play with it like a normal String.

Here is my complete code, here I only attaching the image to the end of the text. However this technique can be apply to any place inside a text.

1
2
3
4
5
6
7
8
9
10
11
NSTextAttachment *starViewAsAttachment = [[NSTextAttachment alloc] init];
    starViewAsAttachment.image = [UIImage imageNamed:@"Your image"];
    NSAttributedString *attachmentString = [NSAttributedString attributedStringWithAttachment:starViewAsAttachment];
    NSMutableAttributedString *hotelName= [[NSMutableAttributedString alloc] initWithString: viewModel.hotelDisplayName];
    /** 
     * Here I'm adding a space after NSTextAttachment just to make sure that
     * the NSTextAttachment will auto change to next line like normal text does.
     * Otherwise the NSTextAttachment does not move to the new line.
     */
    [hotelName appendAttributedString: [[NSAttributedString alloc] initWithString:@" "]];
    self.myUILabel.attributedText = hotelName;

A Little Bit More

Notice that in my case, Stars are one component but not individual separated elements. That being said, no matter how many stars it has, either 3 stars, 4 stars or 4.5 stars, it’s all just one image. The reason that I made it in one image is not that we can’t use multiple NSTextAttachment in a text, but if we do, each NSTextAttachment will be treated as different words. Therefor it may results in situation that the stars might be separated into two different lines when the space is not enough. But that’s not what we want, we want all stars in the same line, either at the current line if there’s enough space or next line if there’s no enough space.

While as we all know, the raw image for it will only include one star, and it’s suppose for us to use to build multiple stars. And the following is how I build this component based on a single image. The component itself is a subclass of UIView. And you got to find yourself a way to turn a UIView into a UIImage, it’s not hard.

1
2
3
4
5
6
7
8
9
10
11
12
13
14
15
16
17
18
19
20
21
- (void)buildViewBasedOnStarNumber {
    NSUInteger starCount = [self.starNumber integerValue];
    BOOL isHalfStar = ([self.starNumber floatValue] - starCount) > 0 ? YES : NO;

    UIImageView *star1 = [[UIImageView alloc] initWithImage:[UIImage imageNamed: @"ic_star"]];
    CGFloat starWidth = CGRectGetWidth(star1.bounds);
    CGFloat starHeight = CGRectGetHeight(star1.bounds);
    [self setFrame:CGRectMake(0, 0, starWidth * (isHalfStar ? starCount + 1 : starCount), starHeight)];

    for (int n = 0; n < starCount; n++) {
        UIImageView *star = [[UIImageView alloc] initWithImage:[UIImage imageNamed: @"ic_star"]];
        [star setFrame:CGRectMake(starWidth * n, 0, starWidth, starHeight)];
        [self addSubview:star];
    }

    if (isHalfStar) {
        UIImageView *halfStar = [[UIImageView alloc] initWithImage:[UIImage imageNamed: @"ic_star_half"]];
        [halfStar setFrame:CGRectMake(starWidth * starCount, 0, starWidth, starHeight)];
        [self addSubview:halfStar];
    }
}

Anagrams

Description

Write a method to decide if two strings are anagrams or not.


Tips:

  • Confirm is it only about one word, or the string could be like a sentence with multiple spaces.
  • The occurrence of certain character in anagrams is same.
  • One method is judge it by comparing the occurrence of each character in two strings.
  • Another option could be sort both strings first, then compare the two sorted string, anagrams will be the same after being sorted.

Pseudo-code

1
2
3
4
5
6
7
8
9
10
11
12
13
14
15
16
open up a fixed sized array, representing the occurrence of each character
for(each character in string1)
{
  array[character]++;//count the occurrence
}
for(each character in string2)
{
  array[character]--;//count the occurrence
}
for(array)
{
  if all items == 0;
      return YES;
  else
      return NO;
}

My Objective-C Solution

1
2
3
4
5
6
7
8
9
10
11
12
13
14
15
16
17
18
19
20
21
22
23
24
25
26
27
28
29
/**
 Time complexity: O(2n)
 Space: O(256)
 */
- (BOOL) isAnagram1_4:(NSString *)s1
           withString:(NSString *)s2
{
    if (nil == s1 || nil == s2 || [s1 length] != [s2 length] || [s1 isEqualToString:s2]) return NO;

    int assic[256];
    memset(assic, 0, sizeof(assic));

    for (int n = 0; n < [s1 length]; n++)
    {
        assic[[s1 characterAtIndex:n]]++;
    }

    for (int m = 0; m < [s2 length]; m++)
    {
        assic[[s2 characterAtIndex:m]]--;
    }

    for (int loop = 0; loop < 256; loop ++)
    {
        if (assic[loop] != 0)
            return NO;
    }
    return YES;
}

My Objective-C Solution 2

1
2
3
4
5
6
7
8
9
10
11
12
13
14
15
16
17
18
19
20
21
22
23
24
/**
 Time complexity: O(2nlogn)
 Space: O(2n)
 */
- (BOOL) isAnagram1_4_2:(NSString *)s1
             withString:(NSString *)s2
{
    if (nil == s1 || nil == s2 || [s1 length] != [s2 length] || [s1 isEqualToString:s2]) return NO;

    char string1[[s1 length] + 1];
    memccpy(string1, [s1 UTF8String], sizeof(char), [s1 length] + 1);
    char string2[[s2 length] + 1];
    memccpy(string2, [s2 UTF8String], sizeof(char), [s2 length] + 1);

    sort(&string1[0], &string1[0] + [s1 length]);
    sort(&string2[0], &string2[0] + [s2 length]);

    printf("string1 sorted = %s \n", string1);
    printf("string2 sorted = %s \n", string2);


    return strcmp(string1, string2) == 0;
}

Test the Solution

1
2
3
4
5
6
7
8
9
10
11
12
13
14
15
16
- (void)viewDidLoad
{
    [super viewDidLoad];

    NSString *s1 = @"abcde";
    NSString *s2 = @"ecbda";
    NSString *s3 = @"sdfdf";
    NSString *s4 = @"abababc";
    NSString *s5 = @"ccccc";

    NSLog(@"ret = %d", [self isAnagram1_4:s1 withString:s2]);
    NSLog(@"ret = %d", [self isAnagram1_4:s2 withString:s3]);
    NSLog(@"ret = %d", [self isAnagram1_4:s3 withString:s4]);
    NSLog(@"ret = %d", [self isAnagram1_4:s4 withString:s5]);

}

Remove the duplicate characters

Description

Design an algorithm and write code to remove the duplicate characters in a string without using any additional buffer. NOTE: One or two additional variables are fine. An extra copy of the array is not. FOLLOW UP Write the test cases for this method.


Tips:

  • Confirm how to order the string after removed the duplicates. Exp. "accffcfa" could be either "acf" or "cfa" after removing duplicates
  • Confirm if an array with fixed size is allow to use, or no array is allowed at all.
  • If a fixed sized array is allowed, we can use it to count the occurrence of the characters.
  • Use [NSString stringByReplacingOccurrencesOfString] to replace the duplicated characters with “”, it has the same effect with delete function.

Pseudo-code

1
2
3
4
for(from 0 to (n-1) of the string)
{
  apply replacing the current character with "" to the rest of the string;
}

My Objective-C Solution

1
2
3
4
5
6
7
8
9
10
11
12
13
14
15
16
/**
 Time complexity: O(n)
 Space: O(1)
 */
- (NSString *) removeDuplicate1_3:(NSString *)s
{
    if (nil == s || [s length] < 2) return s;
    for (NSUInteger n = 0; n < [s length] - 1; n ++)
    {
        s = [s stringByReplacingOccurrencesOfString:[s substringWithRange:NSMakeRange(n, 1)]
                                         withString:@""
                                            options:0
                                              range:NSMakeRange(n + 1, [s length] - n - 1)];
    }
    return s;
}

My Objective-C Solution 2

This solution requires an additional fixed size array.

1
2
3
4
5
6
7
8
9
10
11
12
13
14
15
16
17
18
19
20
21
22
23
24
25
26
27
28
29
30
31
32
33
34
35
/**
 Time complexity: O(n)
 Space: O(256)
 */
- (NSString *) removeDuplicate1_3_2:(NSString *)s
{
    if (nil == s || [s length] < 2) return s;

    NSMutableArray *array = [NSMutableArray array];

    NSUInteger i = 0;

    while (i < 256)
    {
        [array addObject:[NSNumber numberWithBool:NO]];
        i++;
    }

    for (NSUInteger n = 0; n < [s length]; n ++)
    {
        BOOL hasAppeared = [[array objectAtIndex: (NSUInteger)[s characterAtIndex:n]] boolValue];
        if (hasAppeared)
        {
            s = [s stringByReplacingCharactersInRange:NSMakeRange(n, 1)
                                           withString:@""];
            n--;
        }
        else
        {
            [array replaceObjectAtIndex:(NSUInteger)[s characterAtIndex:n]
                             withObject:[NSNumber numberWithBool:YES]];
        }
    }
    return s;
}

Test the Solution

1
2
3
4
5
6
7
8
9
10
11
12
13
14
15
16
17
- (void)viewDidLoad
{
    [super viewDidLoad];

    NSString *s1 = @"abcde";
    NSString *s2 = @"aaabbb";
    NSString *s3 = @"";
    NSString *s4 = @"abababc";
    NSString *s5 = @"ccccc";

    NSLog(@"%@", [self removeDuplicate1_3:s1]);
    NSLog(@"%@", [self removeDuplicate1_3:s2]);
    NSLog(@"%@", [self removeDuplicate1_3:s3]);
    NSLog(@"%@", [self removeDuplicate1_3:s4]);
    NSLog(@"%@", [self removeDuplicate1_3:s5]);

}

Reverse a C-Style String

Description

Write code to reverse a C-Style String. (C-String means that “abcd” is represented as five characters, including the null character.)


Tips:

A C-Style String will always have a null character at the end of the string which you can not see, but it’s actually there. So in the case of “abcd”, strlen() will return 4, which indicates the length of the string itself, while sizeof() will return 5, the extra one space is for the \0 known as null character.

Pseudo-code

1
2
3
4
for(from 0 to the middle position of the string)
{
  switch the current character with the corresponding character at the other side of the string;
}

My C++ Solution

1
2
3
4
5
6
7
8
9
10
11
12
13
14
15
/**
 Time complexity: O(n/2)
 Space: O(1)
*/
void reverse(char *s)
{
    if (NULL == s) return;
    size_t len = strlen(s);
    for (int n = 0; n < len / 2; n++)
    {
        char temp = s[len - n - 1];
        s[len - n - 1] = s[n];
        s[n] = temp;
    }
}

My Objective-C Solution

Test the Solution

1
2
3
4
5
6
7
int main()
{
    char s[] = "switch the current character with the corresponding character at the other side of the string";
    reverse(s);
    cout<<s<<endl;
    return 0;
}

If a string has all unique characters

Description

Implement an algorithm to determine if a string has all unique characters. What if you can not use additional data structures?


Tips:

To address a more suitable solution, we should really confirm the scope of set, where those characters come from. Is it ASCII characters? or simply 26 letters? We probably will have different solution for these cases.

Suppose we have a set of ASCII characters. Then we could declare a boolean array of size 256. Each element in this array represents the appearing status of a specific character in the ASCII list. All of the elements are initially set to false which indicate that the character at corresponding position never appeared before, while true indicate that the character has appeared before.

Pseudo-code

1
2
3
4
5
6
7
8
9
10
11
12
13
declare a boolean array of size 256
for(char n in the string)
{
  if( ns corresponding element in boolean array == true)
  //means it already appeared before
  {
      return false;
  }
  else
  {
      set it to true, and continue;
  }
}

My C++ Solution

1
2
3
4
5
6
7
8
9
10
11
12
13
14
bool isUnique(string s)
{
    bool characterPool[256];
    memset(characterPool, false, sizeof(characterPool));
    size_t len = s.length();
    for (int n = 0; n < len; n++)
    {
        int index = (int)s[n];
        if (characterPool[index] == true) return false;
        else
            characterPool[index] = true;
    }
    return true;
}

My Objective-C Solution

Test the Solution

1
2
3
4
5
6
7
int main()
{
    string s1 = "ss";
    string s2 = "abcdefghijklmnopqrstuvwxyzABCD1234567890";
    cout << isUnique(s1) << " " << isUnique(s2) << endl;
    return 0;
}

Understand AssetsLibrary.framework

The AssetsLibrary.framework, mainly, allows you to manipulate all objects inside the Photo.app. Specifically, you can obtain photos and videos from it, as well as add additional photo or video into it, create groups, search inside the library.

It simply has five different classes,

1
2
3
4
5
`ALAsset
ALAssetRepresentation
ALAssetsFilter
ALAssetsGroup
ALAssetsLibrary

`each of which represent different object in the Photo.app, I’ll help you to understand these classes and the relations between them in the following article.


Manage Xcode project using Github

Use Github to source control your Xcode project is really cool and rather convenient. Many of you may have tried to upload or link your current Xcode project to Github, but found it’s annoying because you always got some slight problems that stopped you from reaching there.

Here, i’d like to tell you a really simple way to quickly upload your current project, or a new project, to Github and start to source control it immediately.

Few things that should be prepared before start:

  • A Github account
  • Github app for Mac, download the latest version.
  • A Xcode project that you’d like to push onto Github

Okay, now if you’re ready, let’s start.

Step 1, Create a new repository where you wanna push your project to.

Here i’ve create a new repo called MyXcodeProject

Once it has been successfully created, you shall see your new repo like this

Step 2, Open Github for Mac Client, find and download the project that you just create.

Open the Client, select File -> New Repository or simply press command + N, find the project that we just created under Clone tap.

Press the Clone MyXcodeProject button, choose whatever directory that you want to put this project, /Desktop for example. Once it’s successfully cloned, you shall see something like this.

Step 3, Move your own project into the MyXcodeProject folder that you just cloned.

At this stage, you should have an almost empty folder that you just cloned from the Github server.

Also, you need to have your own project that you want to push onto github. It could be any projects, either a new project or a old project that you’ve been developed for years.

I just created a new project called MyXcodeProjectDemo, and i want it managed by Github under source control.

Now, move all files and folders under your MyXcodeProjectDemo project into the previous cloned folder, like this.

Step 4, In the Github for Mac client, commit all changes that you’ve just made.

Open up you Github client for Mac, click on the MyXcodeProject tab on the very left side. You could see quit a lot changes here, Woooooo.

Press the Commit&Sync button. Once it’s be been successfully committed and synced, open Github page, find the corresponding repository page, you should see the whole project should have been uploaded. Before you go to the next step, please copy the link of your repo, you can do this by clicking the place where my arrow pointing to in the image.

Step 5, Open Xcode, check out the project from your Github repo

Close Github client for Mac, delete all the files and folders you created before, including MyXcodeProject and MyXcodeProjectDemo. Yes, you don’t need them any more, it’s all being managed by Github already!

Open the Xcode application, select Check out an existing project. In the next page, you’ll be able to select on a repo to check out, or in this case, you should paste the link of your repo into the textfield.

Select a proper location that you’d like to put your project for long term.

Once it’s finished, you’ll have the project ready for you to develop with source control by Github enabled. Try to make your first modification on the source code, then commit&push it to Github – in Xcode select Source Control -> commit or press shift + command + C, and make sure you’ve checked the push to remote in the following window .


iOS7 Auto Layout

If you don’t supply any constraints at all, Xcode automatically assigns a set of default constraints, known as the automatic constraints. It does this at compile time when your app is built, not at design time.

Xcode only creates automatic constraints if you did not set any constraints of your own. As soon as you add a single constraint, you tell Xcode that you’re now taking responsibility for this view. Xcode will no longer make any automatic constraints and expects you to add any other constraints this view needs.

When it comes to Auto Layout, orange is bad. Interface Builder drew two orange boxes: The dashed box displays the view’s frame according to Auto Layout. The solid orange box is the view’s frame according to how you placed it in the scene.


Heading to the United States

It took my such damn long time to make this final decision. I should have being in the US if i could made the decision earlier. It’s been really tough for me in the past 8 months. A lot things happened to me, well frankly speaking, actually that’s just one thing. My girlfriend left me and went to US. My life got totally lost after we broke up. I couldn’t focus on my work or whatever i should do really. I can’t even find the meaning to stay in this country anymore. I don’t know what to do, feeling like helpless, lost in the middle of this huge country. I lose initiative to do anything.

I have waste a lot of time. I know i need to move on, i just can hardly find a way. I’ve tried everything to get out from the deeply lose of last relationship, but always turns out to be failed. I just can not control my mind.

..